Christmas Pot Holder Handprint Crafts

This is the best craft to do with your kids! All you need is paint, your baby’s hands and feet, patience, and cheap oven mitts or pot holders!

Although little man did not want to cooperate today with the paint, I still got some cute prints out of it! So this craft works even with the ones who don’t feel like crafting and making fun memories!

Doesn’t it feel like sometimes you are the only one who cares about making memories? I don’t know, sometimes I feel like I HAVE to capture moments with pictures, I have to make all of the cozy memories, or it won’t get done!

This probably isn’t true, but it pushes me to do the things that sometimes aren’t easy (like painting a 7 month old’s hand and trying to press it on a pot holder). But they turned out so adorable so I am happy I didn’t give up! And all little man needed was a nap.

So these were so easy and I used pan holders that I bought from the dollar store! That’s right, they were a dollar for a 2-pack of red and brown pot holders. So I got 4 for 2 dollars! So awesome! For the paint I just used acrylic paint and found different colors needed more layers (white for instance).

If you run into the problem that maybe you didn’t capture the full hand or foot print, I just go back over with a small paint brush to make it more solid! The goal should be to try and get at LEAST an outline of your baby’s print so that you can fill it in!

I painted for different types but there are so many things you can do with it! I chose to do a santa foot, a Christmas tree foot, an elf hand, and a snowman hand! You could probably try a reindeer hand, snowman foot, or really anything you can imagine!

1. Santa foot craft

So I loved doing this one! I just painted little man’s foot with white paint and pressed it on the mitt! Then I mixed up a peach color for Santa’s face, used the round end of the brush with some pink for his rosy cheeks, used the end and dipped it in black for his eyes, and red for his nose! Then I painted a Santa’s hat on top! What I love about crafts like this is it really can be tweaked and crafted to your liking! Look at his little toes! I love them 🙂

2. elf hand POT HOLDER CRAFT

Look at his little pinky! I love this one too. I can’t choose my favorite! What I did was actually make a hand print with white paint first. With it being a dark colored fabric I wanted to make sure the color showed up well! Then I painted with peach for his face, green on the three fingers for the elf’s hat, and used the end of the brush to make the pink cheeks, eyes, and nose. It says ‘Santa’s Little Helper’ in dot prints! With some little Christmas lights on the sides for decoration! Just have fun with it! If your baby is big enough, they can decorate them themselves for their Mimi’s and Pawpaw’s!

3. Christmas Tree Foot Mitt Craft

“Oh Christmas Tree, O Christmas Tree, How lovely are your tosies”. I love his little toes so much! I may be obsessed. This one is really adorable and can be extra crafty by adding glitter and other stuff! We went simple with a star on top and some little ornaments! But what I love about this craft is because it’s so easy on your money, you can buy extra and do different variations!

4. Snowman hand print craft

This one turned out so well! I just used some white paint to print it, drew on a hat, scarf, and carrot nose and a snowman it turned to be! “Snow Cute” was so cheesy but necessary! I had to use about three layers of white for it to be clear but it wasn’t too bad.

I truly love these so much! They were so cheap, so easy to do, and I have them forever! The thought of pulling these out every Christmas, even when his hand is too big to fit, just melts my heart and brings a tear to my eye. It really isn’t about perfection with homemade crafts, it’s about memories, and creating something that can stay in your homes forever.

I can’t wait to see what you do with your little ones! Please share with me so I can smile alongside with you! Happy homemaking!

Perfect Oven Roasted Potatoes

To be crispy, to be fluffy, that is the question. How to make a potato both crispy and fluffy at the same time? My perfect oven roasted potato recipe will tell you how to roast the perfect potato Every. Single. Time.

Finding the method to roast a potato perfectly was very important to me. My daddy is a potato-holic. He needs potatoes with every meal. You heard me. Needs.

Being Southern, he often turned to the good ole fattening mashed potato. So while I lived at home and often cooked dinner, I wanted to find a healthier alternative for this picky eater. And my oven roasted potatoes did the trick.

While I kept trying to find out how to get them crispy but also done on the inside, I went through many pans of half baked potatoes (yuck) to soggy ones (even yuckier).

FINALLY. I found the solution. Par-cooked then roasted. It left me with the fluffiest tender inside and the crispiest outside. And my daddy loved them! I hope you will too!

What I love about this recipe is it works for any type of potato and you can alter the seasonings based on the meal! When I make Italian chicken, I mix pesto and parmesan with them. When I make Mexican, I use a blend of cumin and chili powder. The following recipe is my simple, every meal roasted potato! So let’s get to business.

OVEN ROASTED POTATOES

What you will need:

  • About 4 medium-large sized red potatoes (diced into about 1″ cubes)
  • 1 tbsp olive oil

Dry seasonings:

  • 1 tsp salt
  • 1/2 tsp black pepper
  • 1/2 tsp onion powder
  • 1/2 tsp garlic powder
  • 1/2 tsp paprika

Directions:

Preheat oven to 425°F.

Wash and dry your potatoes and then dice them into 1″ cubes (try to get them all around the same size so they will cook evenly).

Place them in a large microwaveable bowl and cover with salt (not included in dry seasonings above; this is just for par-cooking).

Fill bowl with water until about 1″ of water is above the potatoes. Microwave for 10 minutes.

Prepare a baking pan with aluminum foil. Once the potatoes are finished, drain the water and return to large bowl.

Add olive oil and dry seasonings and mix thoroughly. Spread out onto baking pan so that each potato has it’s own room (they’re claustrophobic).

Bake for 25-30 minutes until desired color is reached! (It helps to stir around about half way through so that every side is evenly cooked).

Once finished, try not to eat all of them before your family gets some!

I love to serve these potatoes with chicken, salmon, ice cream, whatever really that gives me an excuse to make them.

Give them a try and let me know what you think!

Happy homemaking!

Eat when you’re hungry, not when you’re starving.

Jesus answered, ‘It is written: Man shall not live on bread alone, but on every word that comes from the mouth of God.”

Matthew 4:4

What I am sharing is a personal revelation God gave me today but I believe it may help someone. I’ll start from the beginning.

Lately I have been feeling extremely frustrated. Everything has gotten on my nerves; my husband’s breathing, my baby constantly crying when I’m trying to put eye ointment on him.. even my own self has been frustrating (I broke a favorite ornament last night because my hands were shaky).

I just have felt at my limit. With everything. Like a car hanging on the edge of a cliff, and with one leaf it will crash to the bottom with a loud BANG.

This morning was no different. We woke up, had coffee, I was irritated. Trying to feed John who enjoyed 15 spoonfulls of oatmeal and then the 16th one he acted like it was disgusting, spitting it out so it went everywhere. My breakfast getting cold as usual; my hot coffee being enjoyed lukewarm, as usual. I stood up, yelled at him, yelled at my husband, stormed out of the room.

My husband followed me, and it irritated me of course. I yelled, “Why are you following me???” He calmly takes the baby, and says, “Go pray.” Everything in my flesh wanted to smack him. I don’t want to pray. I don’t want to change. I want to be irritated! “Go pray.” He said again.

I reluctantly stomped upstairs to my office and knelt down. As soon as I hit the floor I began to weep. Weariness, frustration, weakness… all came down and hit like a big wave. But the last thing that hit was STARVATION.

My husband and I have been watching a new TV series we found called “Alone”. Professional survivalists compete to see who can survive the longest in hard terrain. We were watching one of the men and you could clearly see that he had let himself starve almost to death. What was astounding was he was sitting on a mound of food! He had been saving fish for the season when he knew the fish would be lacking, but while saving for a season of lack, he was letting himself starve! He got so hungry he decided to try and shoot an animal with his bow. But he had starved himself so long, he couldn’t even pull back the bow and have a weapon. So he crawled back in his shelter, and STILL didn’t eat.

God spoke so clearly to me as I called out to Him, asking, “Why am I so frustrated? Why do I feel so weak?” He said, “You’re starving.”

I realized I hadn’t read my Word or spent some sweet time with Him all week (excuses of busy schedule entailed). And He brought to my memory the man on the show. I was the man. Starving, weak, without a weapon.

I have the Word at my fingertips every single day. Food for my spirit. But sometimes we treat that food as the man treated the fish. We save it for a rainy day; when we are struggling, sad, fearful. But instead of eating when we are simply hungry, we wait until we are starving! And we risk damage to our spirits!

The man had to leave the show because his body was at risk for organ failure. And he cried to the cameraman, “But I have food…” tears running down his face, “I have so much food”. And I cried back, “But you’re starving! You can have food all day, but if you don’t eat it, it doesn’t help!”

I cried as I knelt on the floor in my office. I have food, but I haven’t eaten, and now I am starving.

I am tired of letting my spirit go so long without food, that I end up in starvation mode. Angry, weak, frustrated; yelling at my loved ones, yelling at myself, thinking my life isn’t good, or blessed. When we let ourselves starve spiritually, our flesh grows stronger. It’s opposite of starvation in reality. As our spirits weaken, our flesh strengthens, and we become a puppet to a nature we are free from.

This man had so much fish; and was skipping meals in order to save it for later. If he would have eaten when he was hungry, he would have never been starving.

Let us eat, everyday, as we do with food. Knowing it’s time to eat, we eat. We don’t wait until our bones cry out in starvation, we eat because we know we need it! Why don’t we do the same with our spirits? We know we need His Word to strengthen us, cleanse us, guide us, uplift us, yet we wait until we are starving to go to it!

So as I sit convicted today, by a gracious God Who softly pointed out my weak spots, I am realizing that I have been starving myself, and sitting on a stock pile of food. It’s time we go to our Words, feed ourselves, so we can feed others.

Blessed are those who hunger and thirst for righteousness, for they will be filled.”

matthew 5:6

Top 10 Dried Spices to Own for your Home Kitchen

When starting out the adventure of home-cooking, you may wonder what kitchen basics you need to own in terms of spices. The following list is what I think is a great place to start in what dried spices your kitchen needs!

So when I first started home cooking, there were a lot of recipes that had spices I didn’t own yet. Because some spices can be expensive, I questioned which spices were actually worth buying and owning in my home.

I took many risks and bought spices that I never used and bought some that I use constantly! One thing this home will never produce is a tasteless, spiceless meal. So I use dried spices very often, and pretty much have to buy new ones every other week (I cook at home a lot).

So this list of dried spices is what I use almost on a daily, if not weekly basis when I cook at home. They are what I consider a great starting place for your kitchen spices and then you can get more adventurous from there!

1. Garlic Powder: This is my favorite and literally can be used with any type of cuisine that you are cooking! Whether it is Asian, Mexican, or Italian, garlic powder adds another layer of flavor that makes your home cooking that much better! This is a must have for your kitchen and totally worth spending money on!

2. Onion Powder: This goes along with garlic powder for almost every meal! The only time I would not use this is if I was making a dish that already has tons of onion or dried minced onion in it (you don’t want to over do it with the onion flavor). But this is definitely a necessity for your kitchen.

3. Paprika: There are tons of different paprika out there to buy; sweet, smoked, spicy… there is also just a basic paprika for your kitchen and that is what I usually buy. I use paprika alongside garlic and onion powder for just another layer of flavor and it usually adds such a pretty color to your meals! Definitely a must have.

4. Celery Powder/Celery Salt: Okay so this is one of my favorite spices I have recently found! It gives your food a deep, savory flavor of celery that adds celery to dishes you haven’t put it in or strengthens the celery flavor in dishes where there already is celery. It is a robust flavor that just makes your meals feel rich and delicious. I love this in pot roasts, soups, and pretty much everything!

5. Cumin: Okay so have you ever tasted taco meat and wondered what that major flavor is? That’s cumin! This smoky spice is perfect for Mexican style dishes, chilis, and smoky dishes like bbq. I love to even sprinkle a little of this over some fried eggs and breakfast goes up lik 10 more levels! This is a staple because many recipes call for this spice and it’s delicious! So I definitely recommend buying this one!

6. Chili Powder: This is a robust, and deep flavor necessary for many dishes! I use chili powder alongside cumin many times in my chilis or Mexican inspired dishes! I also use it when I want a hint of smoky spice without going as far as adding red pepper flakes or cayenne. I have a maple smoked bacon recipe where I use chili powder, ground pepper and maple syrup and bake THE most delicious bacon ever! This spice is a staple because it adds a great flavor to many dishes, and you’ll find many recipes call for chili powder! I definitely recommend!

7. Italian Seasoning: I love Italian Seasoning! It’s a mix of some delicious flavors like basil, oregano, and thyme. It’s perfect to add to grilled chicken, soups, spaghettis, and on top of pizzas to take them to the next level! It’s a great place to start in buying seasonings that take your food to the next level!

8. Dill Weed: THIS is my favorite! I was introduced to dill when I was introduced to Russian cuisine (my best friend’s mama is the best cook btw). Dill is what you think, the flavor in pickles, that is just so unique but so tasty! I love to put dill in chicken soups, on top of fish, and in sauces! A little goes a long way that’s for sure! One of my favorite stuffed bell pepper recipes calls for tons of dill and it is so delicious! This is a definitely a kitchen staple for me!

9. Dried Basil: Fresh basil is delicious! However, dried basil also brings a depth of flavor to your meals! I love to use basil in my tomato soups, Italian cooking, and spaghetti! When I am feeling fancy, I sometimes sprinkle some basil over my cold cut sandwiches, just to add some delicious flavor! This is used in many dishes and definitely worth having in your kitchen.

10. Cayenne Pepper/Red Pepper: So if you love a little kick to your meals, this is the spice for you. A LITTLE GOES A LONG WAY! Funny story, I bought “red pepper” which is another name for cayenne and I didn’t know it. Put a ton of it in a recipe and had no clue as to why my tongue was burning; the culprit? Cayenne. So definitely use with care but cayenne adds a smoky, rich spice to your dishes and is great for the adventurous palette that loves spice! I use it in my chilis, soups, meats, and pretty much anything I want to add a little heat to! Definitely a must have in your kitchen.

So there’s my list of 10 Dried Spices to have in Your Home Cooking Kitchen! I own so many more of course, but these will get you started and make your meals THAT much better!

I hope this helps any new starting home cookers or even those starting out in a new home wondering what spices to buy! Let me know what you think, and as always, Happy Homemaking!

Oven Baked BBQ Bacon Cheddar Chicken

Made this for dinner last night and my husband and I didn’t speak for 30 minutes. Not because we were angry. Because it was so delicious we literally could not stop eating it.

This oven baked bbq bacon cheddar chicken is everything you want in a family dinner dish. It’s easy to cook, easy to put together, and definitely easy to eat!

Even though it’s gluten free, you will feel a little guilty while eating it. You literally won’t be able to eat bbq chicken any other way!

BBQ BACON CHEDDAR CHICKEN

What you will need:

  • 1 lbs chicken breast or chicken tenderloins
  • 1/2 cup shredded cheese (I used a Mexican shredded cheese)
  • 1/4 cup bbq sauce (sweet baby rays is my favorite)
  • 1/4 cup diced bacon (freshly cooked or real bacon bits will work)
  • 3 stalks of green onion (topping)
  • Ranch dressing (drizzled for a topping; trust me)
  • Dry seasonings:

    • 1/2 tsp salt
    • 1/2 tsp ground black pepper
    • 1/2 tsp paprika
    • 1/2 tsp garlic powder
    • 1/2 tsp onion powder
    • 1/2 tsp cumin

    Directions:

    Preheat oven to 425°F.

    Slice about 4 chicken breasts in half and place in cast iron skillet [You can use a casserole dish too but I love using the skillet for this].

    Sprinkle dry seasonings over chicken so that each one is well coated. Then rub bbq sauce over chicken with rubber spatula or brush, making sure each one is well coated.

    Sprinkle cheese over the top and bacon bits. Place in oven and cook for 25-30 minutes [depending on how your oven cooks; ours was done around 25-26 minutes].

    Once finished, serve with chopped green onions and a drizzle of ranch!

    I served my bbq chicken with my delicious oven roasted potatoes and some southern green beans (which I will be sharing soon)! I hope y’all love it as much as my family does! Let me know what you think.

    Happy homemaking!!

    Top 10 Gluten Free Products to Buy at Costco

    When going gluten free, whether for health reasons or by choice, one of the hardest things is risking expensive purchases and not knowing if you will like it or not! So I am sharing some of my favorite Costco gluten free products that are so worth the money.

    If you have eaten the gluten free diet, whether by choice or by diagnosis, you have probably realized two things: 1. You pretty much have to cook everything, or 2. Buy pre-made gluten free products that are incredibly expensive.

    For me I have a slight gluten intolerance that has led me to the gluten free diet. And though I make ALOT of things from home, there are certain things that I would rather just purchase. However, when making a purchase of gluten free items, it’s always a shot in the dark whether it will be good or not. Sometimes gluten free products lack taste, texture, and the “I want more” aspect. You feel as though you are being punished rather than enjoying something to eat.

    So I have decided to share with you some of my favorite gluten free products you can buy at Costco! And if you don’t have a Costco membership, then you can order online I am sure!

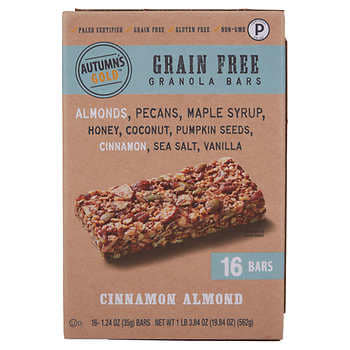
    1. autumn’s gold grain free granola bars

    So these gluten free granola bars are absolutely freaking delicious!! Sometimes with gluten free granola bars you feel as though you are eating dried dirt; no flavor, the texture leaves you needing a gallon of water, and they are freaking expensive.

    My husband and I were walking around Costco and thank God they were giving out free samples of this bar because I never would have spent the money on it. Mainly because I have tried gluten free granola bars before and been pretty disappointed. BUT THESE. Autumn’s Gold Grain Free Granola Bars are literally the tastiest granola bars I have ever had, gluten free or not!

    They taste sort of like a cinnamon roll. YES. And their texture is heaven on Earth. I literally threatened my husband telling him not to eat all of them.

    So go try these out! Even if you don’t eat gluten free they are worth the buy!

    Autumns’s Gold Grain Free Cinnamon Almond (16Count/1.24 oz), 19.84 oz

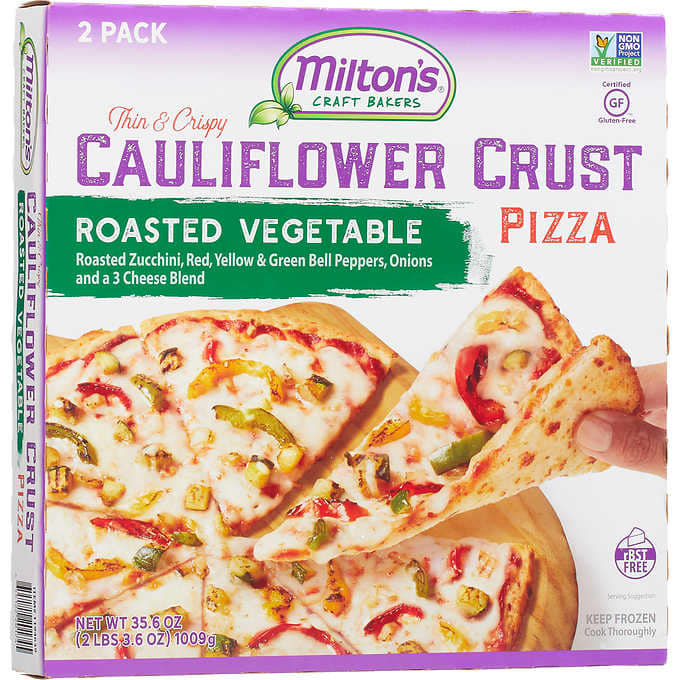
    2. Milton’s cauliflower crust pizza

    Okay so listen. If you know me you know that I LOATHE cauliflower. It has a lot to do with a personal experience of seeing someone with “cauliflower ear” in middle school. But also the taste. I can’t help it.

    HOWEVER. Once again, free samples at Costco saved my life. I love frozen pizza. It saves us on busy days when we don’t have time or really don’t feel like cooking dinner. Often gluten free frozen pizzas are lacking in taste and texture. No one likes a soggy pizza.

    Milton’s Cauliflower Crust Pizza is to die for! I bought the kind that has veggie based sausage on it and it is so delicious you can’t even tell you’re not eating regular pizza OR regular meat. I believe there is also a roasted veggie and regular cheese version too! Get it, it’s delicious.

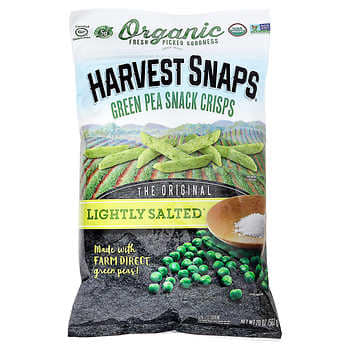
    3. harvest snaps green pea snack crisps

    Healthy. Delicious. SO FREAKING TASTY. I love these things. Honestly I bought these prior to eating gluten free and danced when I realized they were gluten free approved! They are so yummy and healthy and you can eat them without feeling like crap (like when you scarf down a whole bag of flaming hot Cheetos…).

    These are perfect for snack time, your kiddos, and even to blitz up and coat some chicken in! I love them so much. There are also tons of variety of flavors from wasabi ranch, sweet chili, and black pepper. I love them all. Just get them!

    Harvest Snaps Organic Calbee Lightly Salted Snapeas, 20 Ounce

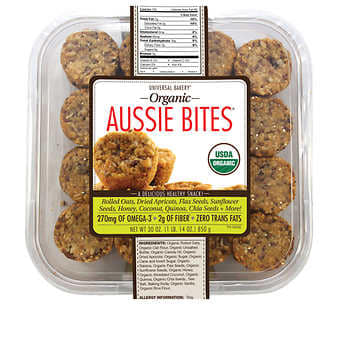
    4. organic aussie bites

    Okay so disclaimer on these! They contain whole grain oats which is debatable on the gluten free issue. They ARE gluten free but you have to make sure with celiac disease whether or not the grains are processed in a facility that has also processed wheat products.

    Aussie bites do not claim to be gluten free for this purpose only. SO. If you are choosing gluten free for personal choice and not for celiac purposes then these are okay for you. If you have celiac disease then I would pass on these depending on your sensitivity!

    Okay so these babies are freaking yummy! They are healthy, have tons of delicious ingredients, and they are so easy to grab on the go for a snack or quick breakfast. Full of flavor, they have things like coconut, dried apricots, sunflower seeds, chia seeds, and honey!

    To me they taste similar to like an oatmeal raisin cookie! I definitely recommend you try these!

    Universal Bakery Expect More Organic Aussie Bites, 32 count

    5. moon cheese

    If you love snacks like cheez-its or any kind of cheese type cracker that is not out-of-bounds, these are perfect for you.

    They are literally made with cheese. That’s it.

    Super cheesy. Super tasty. Highly recommended!

    Even if you’re not gluten free these are just a healthier option over some of the other processed choices. PLUS your kids will love them.

    Moon Cheese – 100% Natural Cheese Snack – Cheddar – 10 oz – 2 Pack

    6. Birch benders gluten free pancake & Waffle mix

    Oh delicious warm, fluffy, steaming, pancakes. They are so warming and comforting. When I went gluten free I was very sad over losing my relationship with pancakes.

    Birch Benders has stepped in to save the day. Their gluten free pancake and waffle mix is perfection. AND you only have to add water (not 15 eggs, you first born son, and a mortgage). Sometimes gluten free mixes need everything but your kitchen sink which can get expensive and tiring.

    For the gluten free, keto, or paleo dieter, I highly recommend this brand!

    Paleo Pancake & Waffle Mix by Birch Benders, Low-Carb, High Protein, High Fiber, Gluten-free, Low Glycemic, Prebiotic, Keto-Friendly, Made with Cassava, Coconut & Almond Flour, 12 oz

    7. Kirkland brands maple syrup

    To go with your Birch Bender’s pancakes, Kirkland’s maple syrup is sooooo good. One thing many don’t know when starting the gluten free diet is that most maple syrups are a no-go.

    Brands like Aunt Jemima, Mrs. Butterworth, and so many others often have hidden gluten ingredients (make sure to check all of your labels).

    So you have to buy organic, 100% pure maple syrups (which I have found are expensive and in very small bottles *rolls eyes*).

    Costco’s Kirkland Brand of Maple Syrup is organic and gluten free and not too expensive. You get tons of product and it’s so delicious!

    Kirkland Signature 100% Maple Syrup, Dark Amber, 33.8 fl. oz.

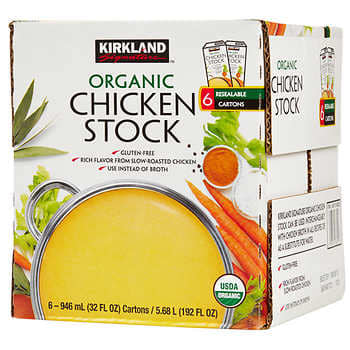
    8. Kirkland’s chicken stock

    Another shocker for the new gluten free eater is that MOST chicken, beef, veggie broths have hidden gluten in them as a thickener! With the upcoming holiday seasons, most recipes need some form of broth!

    Costco’s Chicken stock is certified gluten free AND you get sick of them! This is one of my favorite finds recently that has me so excited! I can get tons of product for a great price and not have to worry about hidden ingredients!

    Definitely recommend!

    Kirkland Signature Organic Gluten-Free Chicken Stock Reasealable Cartons: 6-Count (32 fl oz.)

    9. Udi’s gluten free bread

    If you’re gluten free then you know Udi’s brand I am sure! I have found for ANY gluten free bread, a tip is to always toast! It makes it soooo much better and feels like you are eating fancy bread rather than wheatless bread.

    I love Udi’s brand and found out that you can get a two-pack of the multigrain type at Costco! This is so awesome because gluten free breads don’t have as much of the product as it’s counterpart so you often have to buy more than one. I buy a two-pack and then put one in my freezer and I am good for a couple of weeks!

    I am so happy to see more gluten free products making the shelves and this is one of my favorites.

    Udi’s Gluten Free Foods, Whole Grain Bread, 12 Ounce

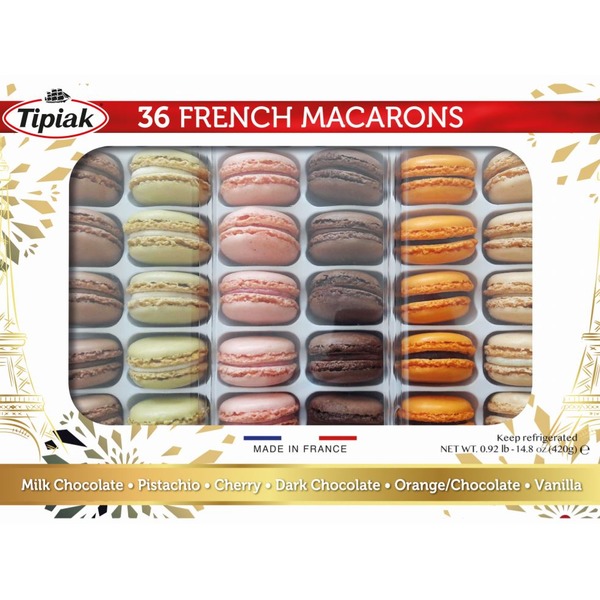
    10. Tipiaks 36-count French macarons

    Saved desert for last. Oh my goodness. When I found out macarons are gluten free naturally, I was so excited. However, these babies are expensive! But Costco has a 36-count French macaron set that are so delicious and run about $15.00.

    They are all delicious but my favorites were the pistachio and milk chocolate ones. These are perfect for a sweet snack at the end of your day, to put out at a baby shower or party, or to even gift to the person you know eating gluten free!

    I love them so much! Y’all definitely need to give them a try.

    French Macarons Mixed 36 pcs

    SO that is my list of TOP 10 GLUTEN FREE PRODUCTS at Costco! Everyone I would personally recommend and have in my kitchen right now! Let me know if you have any more you have found so I can get in on that too!

    The Power of a Lie: Being Free of Mom Guilt

    God doesn’t bless perfect parenting, it does not exist. He blesses humble parenting, a recognition that without Him, it cannot be done.

    baby and me

    If there were a person you knew, who could only tell lies, how often would you listen to what they had to say? What we believe in our minds, regardless or not if they are true, become our reality. Scripture tells us that Satan is the father of all lies (John 8:44). Yet, we continue to allow him to have territory in our minds, which if you are saved, belong to Christ (1 Corinthians 2:16).

    An elephant who is being trained in a circus, can be held down by a tiny nail in the ground, because it believes the lie that it cannot break free. There are many lies that we believe that the enemy tells us. And I feel a certain need to expose these lies, especially the lies we women and mothers hear, so that we can begin to walk in the freedom that God intended us to.

    So I am beginning a small series (of which I do not know the length) talking about the power of a lie. Each post will be another lie exposed so that freedom can be had!

    Today’s post is on a lie that I have been personally battling this week in particular; mom guilt. This lie often shows it’s ugly head in phrases such as: “If you rest or take time to yourself, you’re a bad mom; good moms don’t need a break”, “You’re not doing good enough, your baby should be doing what the others are doing right now”, “If you go to work your baby will miss you and will grow up with issues”, “If you don’t work you won’t be able to provide everything that your baby needs so you’re a bad mom”, “You shouldn’t be taking time to start a blog, you need to be taking care of your baby”, “Your husband is going to resent you if he has to help out more than usual”…. and the lies go on and on.

    No one prepared me for mom guilt. I had heard about it prior to becoming a mom but I didn’t think I would have an issue with it. What was so crazy about it is mom guilt started before John even was born! I remember working (before I knew I would get to stay home with him) and feeling guilty that John would be at his grandmother’s homes all day. I remember pre-counting the amount of time I would have with him and even crying about it to my husband (who probably thought I was crazy).

    “Raising him is my job, I should be the one seeing his first crawl, first steps, first laugh…” Even before I held him in my arms, I believed the lie regarding mom guilt, which is essentially this: the responsibility of your child is yours alone so you better be perfect or else. 

    Now this isn’t to disregard the common sense notion that parents are responsible for raising their children. This is a deeper thought that puts an unbearable amount of pressure and weariness on the mother’s shoulders to be everything and do everything all the time for everybody.

    The reality of this lie this week has shown itself in when I have spent time to write a blog or prepare for an activity. I look in the other room where my husband is feeding and playing with John and I am doing something for myself and then BAM… guilt hits. You are selfish, you are wasting precious time, you shouldn’t be doing this, he needs you… it bombarded my mind this week, almost to the point of leading me to stop doing something I feel like God called me to.

    Finally, I chose to be still. To listen to what God had to say. And this is what He said.

    “Katie, you are not enough. You in yourself will never be enough. Not for Tyler, not for John, not even for yourself.  But in Me, you are enough. I called you and created you to be John’s mama. I called you and created you to do the things I am calling you to do for Me. And in Me, you CAN do both. Trust Me with your marriage. Trust Me with your children. Trust Me with your ministry. Stop allowing guilt to take away the joy of the present moment. Release your husband, children, and ministry to Me, and let Me bear your burdens. If you mess up, then you don’t have to worry, because you have given them into My hands.”

    And I finally felt peace because I realized up to this point I had been trying to carry the burdens of things that He had called me to release back to Him. If I try to carry the pressure of making sure all things are perfect, or taking care of, by ME in my home, then I have set myself up for a load that will crush me. I set my mind up for guilt, fear, anxiety, shame, depression.

    “Come to Me, all who are weary and heavily burdened, and I will give you rest [refreshing your souls with salvation]. Take My yoke upon you and learn from Me, for I am gentle and humble in heart, and you will find rest {renewal and blessed quiet] for your souls. My yoke is easy [to bear] and My burden is light.” Matthew 11:28-30.

    The lie essentially is this: you are not enough of a mother for them. The truth is this: in Him, you are enough because HE is enough.

    As we break down some of these lies in our lives, which will break down the false power they have on us, we will come to know an essential truth. This truth is that not every thought that comes into your mind is yours; which means you don’t have to keep it.

    Let us renew our minds daily, cast every thought that comes against Christ down, and make every thought obedient to Christ. (Romans 12:2; 2 Corinthians 10:5)

    Today let us focus on releasing mom guilt to God. Release that pressure you have put on yourself to be perfect. And trust that God can guide you every day to raise those babies right. And when you have a bad day (which you will), trust that God has your family in His hands and enjoy the abundant blessing of family that He has given you.

    So I don’t know about you, but I am tired of carrying guilt that isn’t mine to carry. I want to boldly walk before my children, showing them a woman of God who will do what He says regardless of comfort or attack, and serve Him mightily with boldness and authority.

    So join me in releasing the power of the lie of mom guilt and be free!

    Happy Homemaking and may God bless you and your families abundantly with grace, mercy, and love!


    Homemade Fresh Pineapple Salsa (Gluten Free)

    For football and holiday parties season, I am always looking for delicious recipes that are easy to make, loving to my budget, and most importantly, DELICIOUS. I finally found my perfect fresh salsa that is a game changer!

    pineapple salsa

    One thing you will learn about me is I love sweet and spicy foods! I stumbled upon this recipe from a usual happenstance; a family party, needing to bring a food item, struggling in the bank, and going to my kitchen to piece together something that’s cheap, easy, and most importantly, delicious!

    This fresh pineapple salsa recipe is now a staple in my kitchen, my family parties, and my life! I no longer even can tolerate the thought of buying store bought salsa when I have this recipe at my fingertips!

    My husband is obsessed, my sister steals the leftovers, and I can’t get enough! What’s also great about this salsa recipe is that like so many other fine things in life, it gets better with age! I love to have this salsa as a healthy snack (with some delicious tortilla chips), paired alongside some homemade quesadillas, or with my easy burrito casserole (which I will be posting soon so stay posted!)

    Enough talk about this salsa, it’s time to hurry and try it so you can truly begin living!

    Fresh Pineapple Salsa Recipe

    What you will need:

    •  20 oz can of pineapples (chunk or whole it doesn’t matter)
    •  4 oz can of diced green chilis
    •  14.5 oz can of diced tomatoes
    •  1 tbsp minced garlic
    • 1 tbsp diced pickled jalapenos
    • 1 tbsp red chili paste
    • 1/2 orange bell peppers
    • 1/2 red onion
    •  1/4 cup cilantro (fresh)

    Dry Seasonings for salsa:

    •  3/4 tsp salt
    • 1/2 tsp ground black pepper
    • 1/2 tsp onion powder
    • 1/2 tsp garlic powder
    • 1/2 tsp cumin (dried)

    Directions for Salsa Recipe:

    For this recipe I use my countertop sized food processor that makes cooking so much easier! It’s quickly put together, you just press the lid to pulse, and it’s easy cleanup!

    Drain the can of pineapples and tomatoes and pulse together in the food processor. When desired consistency is met (I like my salsa very smooth), then remove mixture and place in a bowl and set aside.

    Roughly chop bell peppers, onion, and cilantro and place in food processor. Add minced garlic, red chili paste, jalapenos, and green chilis. Pulse together until smooth and then add to tomato and pineapple mixture!

    Stir well, add in all of the dry seasonings, and serve!

    You can eat right away (if you can’t wait) or it tastes best when refridgerated for about 24 hours! The longer it sits, the more delicious it gets!

    I hope you find this fresh pineapple salsa recipe easy, delicious, and a new staple in your homes as well! Let me know what you think, and as usual, Happy Homemaking!!!

    Stylish and Eye Catching Pioneer Woman 3 Cup Stack & Press Glass Bowl Chopper Fiona Floral,Speeds up Food Prep by Taking Care of the Chopping,Mincing and Mixing for You

    Easy Salt Dough Crafts for Kids

    With the Holidays coming up, nostalgia and memory-making is at an all time high! Here is a fun and easy craft for you to do with your babies or big kids! A simple at-home recipe for old-fashioned salt dough makes making memories so much easier!

    So, this is one of my favorite crafts that I found this year! Having a new baby and going through the Holiday seasons for the first time, I kept wanting ways to make those crafts that scream nostalgia and memories. I found this recipe for salt dough crafts and fell in love!!

    Salt dough is soooo easy to make, you most likely already have these ingredients in your home, and it is a fun craft that you can do with your babies, toddlers, or even your big kids! You can make ornaments, picture frames, and pretty much whatever your mind can create!

    So a lot of people have begun Christmas decorating already and I will be sharing some Christmas crafts soon! However, with Thanksgiving right around the corner, I thought some cute turkey crafts would be a fun way to bring a little more warmth to your home! Salt dough crafts are also so much more fun and less costly than expensive at-home ceramic kits or cement kits that don’t work and are hard to use (especially with a baby who will not cooperate)!!

    So far I have not ran into any issues with baby John letting me use his cute little fingers and toes for memorable craft-making! I have been making so many types of crafts using his hands and feet, and I want to keep everyone of them! I never knew that you would feel guilty for giving one away (cursed mom guilt).

    So with such an easy recipe, you can make so many more crafts so you don’t feel like you’re giving a piece of your heart away!

    Let’s get started so you can get crafting and memory making!

    salt dough thanksgiving crafts

    What you will need:

    • ***1 cup of flour
    • 1 cup of salt
    • 2/3 cup of water
    • 1 tsp cinnamon (optional if you want it to smell a little more like the Holidays)

    *** So a small disclaimer that I learned through trial and error. When choosing what flour to use for your salt dough craft, I would HIGHLY recommend using an unenriched flour that does NOT contain any kind of leavening agent (such as baking powder or baking soda). I found if there is a rising agent in the flour your salt dough craft will bubble up and not stay in the shape you make it into. So just a note!

    There will be directions for all three of the crafts shown of the turkey hand print, the hand turkey, and the foot print! Choose whatever you like or do your own thing and let me know how it goes!

    Directions:

    Preheat oven to 250 degrees (F). [cooking your salt dough at a low heat for a long period of time creates a hardened clay-like substance that lets you keep it forever!!]

    In a mixing bowl, measure out your flour, salt, cinnamon (optional), and water. Mix together until it forms into a dough-like ball! (It should be malleable and not sticky – underneath is what it should look like).

    Once you have the dough ready, prepare a baking tray with parchment paper and divide the dough into thirds.

    Circle turkey hand craft

    Take the first third of the salt dough and form it into a smaller ball, taking a rolling pin (or your hand if you don’t have one) to smooth it out into a perfect circle.

    Once you’ve smoothed it out to the size and thickness of your liking, then you will want to press your babies/kids hand down, making sure it is deep enough to get the print but not too deep to make the bottom weak. Pull the hand up and you should have a perfect print! (If the first try doesn’t work, just re-roll the dough and try again!)

    You can also use the end of a pen to make a hole in the top in case you want to tie a ribbon around it to hang!

    Like all of the rest of the salt dough crafts, bake at 250 degrees F for 3 hours (or until all moisture is gone). Let cool and then paint however you desire!!

    This is raw, unbaked dough! Final craft will be shown below!

    Cut-out hand turkey craft

    Take another third of the salt dough and do the same procedure of smoothing out in a circle, pressing your babies/kids hand, and setting aside. This time, rather than pressing so hard to get a good print, just press hard enough to get the general outline of the hand, leaving enough volume of the dough behind.

    Then take a knife and cut out the outline of the hand and remove the excess dough from around the cut out. Take a small ball of dough and add it to the bottom of the hand (this is where the turkey’s legs will go). Make sure to use your finger to reconnect the hand to the small square at the bottom so they will bake as one piece.

    You will need to bake again at 250 degrees F for 3 hours (or until all the moisture is removed). Once cooled, decorate and have a memory forever!

    Pictured is raw craft unbaked! Final craft will be shown below.

    Thanksgiving foot salt dough craft

    So if you want to just have a keepsake memory craft of your babies/kids foot, this one is for you! You can do this craft any time of the year or for any milestone in your baby’s life (or if you just feel like it).

    Take the remaining amount of salt dough and form into more of an oval rather than a circle (this is necessary if your baby has sasquatch sized feet like mine – who is only 7 months old btw).

    Press baby’s foot into the dough, making sure it’s pressed in deep enough to get each little toe! (An easy way to achieve this for bigger kids is to set the pan on the floor and let them step on it themselves).

    Then bake at 250 degrees F for 3 hours (or until moisture is fully removed) and decorate as you please!

    This dough is still raw! Final craft will be pictured below.

    Yay crafting!

    Now that your salt dough crafts are cooled and decorated, it’s time to set them around your house and let the memory-making begin! I remember growing up loving to look at all of the crafts I made as a kid, so I wanted to do the same for John!

    Not to mention, I will now have a forever keepsake that will have his little hands and feet captured for a moment. I am a very nostalgic person, and want these salt dough crafts everywhere around my house for every Holiday!

    And when John is older you better believe we will create salt dough ornament crafts together every year!

    It’s okay to want to make memories, and easy recipes like this will make that actually seem doable! I hope you find much fun and memory-making from this, and most importantly, happy homemaking!!

    finished salt dough crafts:

    Yay!!! I love them so much!

    Below are some more ideas that I’ve done for this fall!

    Acorn Craft
    Pumpkin Craft!

    I hope you all enjoy this Thanksgiving salt dough craft as much as I always do! Can’t wait to see your keepsakes and memories, happy homemaking!!!

    Crockpot vs Instant Pot: What’s the Deal?

    Definitely a question I have been asked before: what’s better? The crockpot or the instant pot? Let’s talk about pros, cons, and truths!

    Me posing with my loves….

    Okay, so the picture may be having you question some things about me. But to help clear up any confusion, I have posed with my crockpot and instant pot for one reason: THEY ARE MY LIFE.

    To compare the two would be akin to comparing your children: you love them both equally, for different reasons! So this post is not so much why you should purchase or own a crock pot versus an instant pot, but really my argument as to why BOTH are necessary for the modern homemaking mama!

    Crock pot

    Let’s start with O’ Faithful, the crock pot. So surely you have one of these in your home (whether it gets used or not). They are often a staple for the bridal shower or home warming part because so many have seen the benefits of having one. They are pretty affordable, even for the budgeter, which makes it definitely a must have kitchen tool. If you don’t have one, I am holding my Pioneer Woman crock pot which I LOVE because they have so many different prints to choose from. But all crockpots are awesome and totally worth investing in.

    But let’s talk about practicality. The crockpot opens soooo many doors for your home-cooking and is perfect for the busy stay-at-home mama or working mama. Whether you stay home or are working, finding the time to get dinner planned and cooked is always tough on these hectic days of doing every day tasks and taking care of your family. With the crock pot you can make so many delicious recipes, from overnight breakfast oats, slow-cooked pot roasts, and even decadent deserts! The crockpot is ideal for the working mama who can put the meal in during the morning rush and come home to a hot, finished meal!

    Some of my favorite crock pot meals are classic pot roast, chili, vegetable soup, and French dip sandwiches! I don’t know what it is, but there is just something so satisfying about a crock pot meal; they are so warm and cozy, it just makes you feel at home and comforted!

    So, all of this to say. Get a crockpot or start putting the one hiding in your cabinet in the box to use! They make your life so much easier.

    Hamilton Beach 8-Quart Programmable Slow Cooker With Digital Timer, Dishwasher-Safe Crock & Lid, Silver (33480)

    Instant pot

    Here’s the thing. When I first heard of the instant pot, I rolled my eyes thinking, oh great another fad to spend money on that I will use once and then it will collect dust in the cabinet (like the air fryer for me). Everyone at my job was raving about it and honestly I was too timid to try it.

    However, Pioneer Woman came out with an instant pot which peaked my curiosity (because I want to own everything she makes; I know I have a problem, pray for my husband). So I asked for one for Christmas and thus, my cooking truly life began.

    After being afraid of using the instant pot (due to scary stories posted on social media) I finally took the step to try my first intant pot recipe! I tried an Instant Pot Cubed Steak recipe that was so quick and delicious it blew my mind and changed my life forever!

    So the instant pot is pretty much a pressure cooking tool that also has soooo many different uses! There is actually a slow cooking mode on it that allows it to act like a crock pot if you need it to! But what would take the crock pot 8 hours to make, your instant pot can cook in 1 hour (yes you read that correctly).

    It makes your meal taste as though it has been cooking all day, and yet some recipes take only around 10 minutes (like my gluten free tomato soup you can find in my recipes). Not only can it cook meals quickly, but you can make hard boiled eggs in 5 minutes, cook baked potatoes in 10 minutes, and even fully cook chicken and pork in 12 minutes!

    I mean, it is definitely worth investing in (even though it can seem pricey to some). It made my life so much easier as a wife, mama, and full-time student when I was getting my master’s degree.

    Get you an instant pot, I promise it is worth it!

    Instant Pot DUO60 6 Qt 7-in-1 Multi-Use Programmable Pressure Cooker, Slow Cooker, Rice Cooker, Steamer, Sauté, Yogurt Maker and Warmer

    crock pot vs. instant pot

    My final statement is that there is no versus between the two there is only that the crock pot and the instant pot are necessary for the modern day homemaking mama.

    I use my crockpot when I have a busy afternoon planned (because you still have kitchen prep with the instant pot) and I use my instant pot when I want a delicious meal cooked in such a little time (or I forgot to plan or start a dinner that takes too long to cook).

    Stop letting busy days and no time lead you to fast food meals and spending way too much money on eating out (this was our life before), and start using tools that make your life easier and also makes your home feel a little more like home with delicious home-cooked meals and dinners around the table.

    Let me know what you think, some of your favorite crock pot and instant pot meals, and most of all: Happy homemaking!