Oven Baked BBQ Bacon Cheddar Chicken

Made this for dinner last night and my husband and I didn’t speak for 30 minutes. Not because we were angry. Because it was so delicious we literally could not stop eating it.

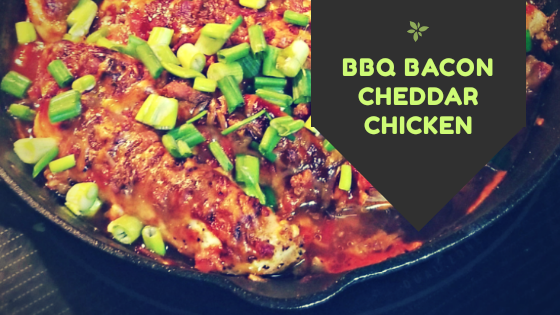
This oven baked bbq bacon cheddar chicken is everything you want in a family dinner dish. It’s easy to cook, easy to put together, and definitely easy to eat!

Even though it’s gluten free, you will feel a little guilty while eating it. You literally won’t be able to eat bbq chicken any other way!

BBQ BACON CHEDDAR CHICKEN

What you will need:

  • 1 lbs chicken breast or chicken tenderloins
  • 1/2 cup shredded cheese (I used a Mexican shredded cheese)
  • 1/4 cup bbq sauce (sweet baby rays is my favorite)
  • 1/4 cup diced bacon (freshly cooked or real bacon bits will work)
  • 3 stalks of green onion (topping)
  • Ranch dressing (drizzled for a topping; trust me)
  • Dry seasonings:

    • 1/2 tsp salt
    • 1/2 tsp ground black pepper
    • 1/2 tsp paprika
    • 1/2 tsp garlic powder
    • 1/2 tsp onion powder
    • 1/2 tsp cumin

    Directions:

    Preheat oven to 425°F.

    Slice about 4 chicken breasts in half and place in cast iron skillet [You can use a casserole dish too but I love using the skillet for this].

    Sprinkle dry seasonings over chicken so that each one is well coated. Then rub bbq sauce over chicken with rubber spatula or brush, making sure each one is well coated.

    Sprinkle cheese over the top and bacon bits. Place in oven and cook for 25-30 minutes [depending on how your oven cooks; ours was done around 25-26 minutes].

    Once finished, serve with chopped green onions and a drizzle of ranch!

    I served my bbq chicken with my delicious oven roasted potatoes and some southern green beans (which I will be sharing soon)! I hope y’all love it as much as my family does! Let me know what you think.

    Happy homemaking!!

    Egg Roll in a Bowl (Gluten Free)

    Y’ALL. This recipe is a game changer for me! I love Asian food; Chinese, Japanese, you name it, it’s my favorite food. However, when I went gluten free I felt like I lost the opportunity to just go to the Chinese restaurant and get what I want. So I had to learn how to make it at home (which those recipes will come soon). However, I have yet to attempt a gluten free egg roll because… how? So! This recipe is perfect for a gluten free, low carb lunch that reminds you of those delicious egg rolls (that sometimes are just a tad too greasy)! It’s also super easy and customizable to whatever your taste is! I found this recipe and made it my own and I’m so excited to share it with you. Let’s get to it!

    Egg Roll in a Bowl

    What you will need:

    • 1 lbs ground meat (beef, pork, or chicken) (my favorite is chicken)
    • 1 package of slaw mix
    • 2 stalks of celery (diced)
    • 5 stalks of green onion (3 diced for mixture, 2 for topping)
    • 1 tbsp minced garlic
    • 2 tbsp soy sauce (Gluten Free)
    • 1 tbsp red chili paste or siracha (add more or less depending on your spice level)
    • 1 tbsp honey
    • 1 tsp sesame oil
    • 1 tsp vegetable oil
    • 1 tbsp rice wine vinegar
    • sesame seeds (for topping, optional)

    Dry Seasonings:

    • 1 tsp ground black pepper
    • 1/2 tsp salt
    • 1 tsp ginger (dried or sub 1 tbsp fresh ginger)
    • 1/4 tsp allspice (optional but super delicious)
    • 1/2 tsp garlic powder
    • 1/2 tsp onion powder

    Directions:

    In a soup pan or deep sauté pan, heat sesame and vegetable oil to medium-high heat. Toss in diced celery, green onion, and minced garlic and stir. Then toss in minced meat of choice, chopping up finely with spatula to make it very fine. Once the meat is mostly cooked, add in slaw mix and stir. Then add the following: soy sauce, red chili paste, honey, rice wine vinegar, and all dry seasonings. Stir well and cook until the cabbage in the slaw mix is cooked down and softened! When done, put in a bowl and top with dice green onions and sesame seeds! 

    Total cook time takes about 25 minutes of prep and cooking! It’s so fast and easy, and most importantly super delicious. 

    I hope you enjoy this recipe! Comment with your thoughts and pictures and let me know how it went! Love you guys and happy homemaking! 

    Homemade Tomato Soup (GF)

    Finally! It is fall time and we can stuff ourselves with all of the soups. All of them. If you’re gluten free, it is hard to find affordable soups that don’t have gluten in them! And if you can, a lot of the time they are so bland and tasteless! If you’re not gluten free, you probably don’t want all those soups that are high on sodium and preservatives. And let’s be real, organic food is soooo expensive.

    I am gung-ho on yummy food that is also easy AND most importantly, affordable! So this recipe is one for you! It’s delicious, warm, filling, delicious, easy, and did I mention delicious? Now, I made this soup in my instant-pot (Pioneer woman because I’m obsessed), so if you do not have one I seriously urge you to invest in one! It is worth every dime! But if you still want to make this recipe just do it on the stove top in a deep pot! I will attach a link to the instant-pot I have, it’s so amazing. I’m just saying. 

    Instant Pot DUO60 6 Qt 7-in-1 Multi-Use Programmable Pressure Cooker, Slow Cooker, Rice Cooker, Steamer, Sauté, Yogurt Maker and Warmer

    So here it goes! 

    Homemade Tomato Soup

    What you will need:

    • 3 cans of diced tomatoes
    • 2 roma tomatoes (diced)
    • 1/2 onion (diced) (Vidalia is my favorite but you can use any kind)
    • 2 stalks of celery (diced)
    • 1/2 roasted red pepper (diced) (I use canned, it’s delicious)
    • 1 tbsp pesto (trust me, it adds THE best flavor)
    • 2 cups of chicken broth (if GF, make sure you get GF broth)
    • 1/2 cup milk
    • 1 tbsp kethup (again, trust me)
    • 1 tbsp butter

    Dry Seasonings:

    • 1.5 tsp salt
    • 1 tsp black pepper (I use restaurant grind)
    • 1 tsp garlic powder
    • 1 tsp onion powder
    • 1 tsp celery salt
    • 2 tsp basil (dried)
    • 1 tbsp granulated sugar or honey

    Directions:

    Set your instant pot to sauté mode and add 1 tbsp of butter (I prefer to use butter over oil in soup so that it isn’t oily in your mouth!). Add in diced onion, celery, canned tomatoes, roma tomatoes, roasted red peppers and minced garlic. Stir around and let the veg get soft! Then add in 1 tbsp of pesto (if wanted) and stir around in softening vegetables. Add in chicken broth and all dry seasonings above.

    Put on the instant pot lid and MAKE SURE YOU TURN IT TO SEALING! If you do not seal then you won’t build pressure and the whole point is to get a soup that tastes like you’ve cooked it for hours when it’s only in the pot for 10 MINUTES… that’s right. 10 Minutes! Turn off the sauté mode and hit “Manual” for 10 minutes. It will take some time and make some noise as it builds pressure, and all you have to do is chill!

    When it’s done, do a quick release (be careful) and let all of the steam stop before attempting to open. Now for this next part you can either use an immersion blender or a counter top blender! But it is necessary for the best texture to blend the soup! When you open the instant pot, you will notice there are still chunks of veggies and it doesn’t quite look like tomato soup! Take the immersion blender and blend until desired texture is found! If you are using a countertop blender, you can ladle in portions of the soup until it is all blended and return to pot. Once blended, you will want to add milk and ketchup, stirring well! At this point it is your turn to taste and adjust according to your family’s taste buds (if you like more salt, add it here!).


    The best way to serve is with a grilled cheese with some sour cream and basil on top! If there is any left over, it is good for up to about 3 days!

    I hope you enjoy and let me know what you think! (Post pics too!)